Want to Display Up to 4 Mobile Devices on the TV in Rooms T123 and T124?

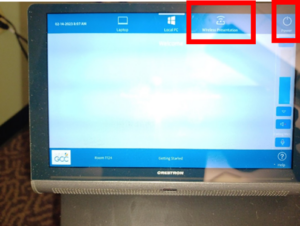
1. Press the Wireless Presentation icon on the 7-inch Crestron screen on the computer cabinet

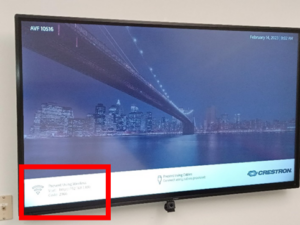
2. The wall TV screen will power on and display the following screen. Note the http: address and code displayed in the lower left corner

3. Enter the http: address into your mobile device’s web browser and the code, when prompted. Follow the on-screen directions.  You will be prompted to download and install the Air Media app, which will allow your device to display on the room’s TV

4. To turn off the mobile device sharing system, press the Power icon on the 7-inch Crestron, then press Yes

5. For future use, you may enter the http: address in your browser or open the Air Media app on your mobile device. Although the http: address will remain constant for this room, the 4-digit code will be different for each display session

6. Note that this tool displays video content only, no audio. Also, the room’s PC may not be displayed simultaneously


Panopto Frequently Asked Questions- Support

Last update: 12/22/22

This document contains responses to Frequently Asked Questions (FAQs) about the Panopto Video Library system.  If you have questions about Panopto, including questions/answers you would like added to this document, please submit a Help ticket at https://hd.genesee.edu (see tab in upper right).

Today’s PAD session will highlight some frequently asked questions (FAQs), with the bulk of time allotted for you to receive support on, and to explore and practice, features that are of specific interest to you. although the time will be devoted to giving you time to explore what is of particular interest to you.


My top recommendation is to visit Panopto’s Support website.   http://support.panopto.com   Search by topic or keyword.  Step-by-step directions and/or videos available—these are well prepared, easy to follow, and very helpful.


  • How to use Panopto with Brightspace [This is a refresher for most folks who used Panopto in Fall 2022 Brightspace course sites]
    1. IGNORE the beginning part of the video that discusses adding Panopto to your Brightspace course. This is done automatically by GCC when your Brightspace course is created.  Look for the Panopto module in your course(s).
    2. How-to video: https://howtovideos.hosted.panopto.com/Panopto/Pages/Viewer.aspx?id=5352d93d-150a-439e-b02f-ab8200fdf960&query=embedded%20video%20viewer
    3. How-to document: https://support.panopto.com/s/article/How-to-Use-Panopto-with-Brightspace


  • How do I share or restrict my Panopto videos?
    1. Log into your Panopto library ( https://genesee.hosted.panopto.com Use your GCC myGCC login credentials if prompted)
    2. Faculty may prefer this option: You may access your Panopto library/videos through the Panopto module in your Brightspace course.
    3. Look for your topic under the Documentation or Video Tutorials tabs. You also may search by keyword within each of these tabs
    4. Be mindful that people who are not in the GCC organization (i.e., user@genesee.edu) will need you to provide them with a link/URL.
    5. Click the Change link next to Who can access this video to adjust the “level” of access. Generally speaking, videos you will embed in your Brightspace courses should be set to Your Organization (unlisted) so that only those with the direct link/URL may access.  This setting will prevent others within GCC from seeing or accessing the video by clicking the Everything button in the Panopto library. This limitation is especially important for any videos containing student voices and/or likenesses, to be in compliance with FERPA regulations.
    6. How-to video: https://howtovideos.hosted.panopto.com/Panopto/Pages/Viewer.aspx?pid=4cecd7bd-4285-4717-8422-af460141822c&query=share%20video&id=624ad7f3-3256-47c1-ba09-ad74018201a9&advance=true
    7. How-to document: https://support.panopto.com/s/article/Share-with-Multiple-Users


  • How do I play certain components of a recorded video (e.g., slides, full screen, closed captioning)
    1. Zoom recordings (i.e., often recorded classes) and recordings made with Panopto generally capture multiple components—e.g., primary video (usually the web camera showing you), secondary video (if you’re showing Power Point slides or something under a document camera). You may adjust Panopto settings to display a particular component instead of all simultaneously.
    2. How-to video: https://support.panopto.com/s/article/Navigate-the-Viewer (includes other Viewer information, too)
    3. How-to document: https://support.panopto.com/s/article/Learn-About-the-Features-of-the-Embedded-Video-Viewer


  • How do I manage captions in videos?
    1. Captions in videos are essential to making them accessible to those with hearing challenges. Panopto allows you to add and modify captions.  While the tool you use to record videos may automatically create captions (e.g., Zoom), you may need to revise these captions to address misspellings, especially technical jargon.
    2. How-to video: https://support.panopto.com/s/article/Manually-Caption-Your-Videos
    3. How-to document: https://support.panopto.com/s/article/Learn-About-Best-Practices-for-Captioning


  • How do I edit videos? [e.g., trim a video, add automatic captions, add a table of contents]
    1. The Panopto Support website has several succinct videos and documents to guide you on different editing tasks. See below.
    2. How-to videos: https://howtovideos.hosted.panopto.com/Panopto/Pages/Folders/DepartmentHome.aspx?folderID=4b9de7ae-0080-4158-8496-a9ba01692c2e (scroll down and look for the Edit heading on the left)
    3. How-to documents: https://support.panopto.com/s/topic/0TO39000000EoviGAC/edit


  • How do I create videos?
    1. Panopto has a video creation tool, which you are free to use. However, you are free to use any tool to create videos and to import them into your Panopto library.
    2. How-to videos: https://howtovideos.hosted.panopto.com/Panopto/Pages/Folders/DepartmentHome.aspx?folderID=4b9de7ae-0080-4158-8496-a9ba01692c2e  (scroll down and look for the Create heading on the left)
    3. How-to documents: https://support.panopto.com/s/topic/0TO39000000EovdGAC/create


  • How do I change a video’s preview image (e.g., the thumbnail)?
    1. By default, Panopto selects an image from the primary video (often you as seen through your web camera). Some faculty prefer an image that corresponds to the content of the video.
    2. Use Power Point to create a slide with the content, image, etc you wish to have as your thumbnail. Save the slide as an image (e.g., .png, .jpeg), instead of the default Power Point file format, under the Save Format option.
    3. Follow the steps in this video: https://howtovideos.hosted.panopto.com/Panopto/Pages/Viewer.aspx?id=72ccfb49-28a5-4a11-9f3d-abc30141e19f&query=preview%20image


NOTE:  This information will be shared during GCC’s January 2023 PAD session.

Microsoft Office 365 for Home Use (GCC Students)

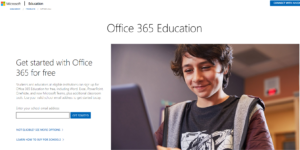
Go to:  http://www.office.com/getoffice365

  • You will come to a page something like this (it will change, but do not click on the “Student” or “Teachers” links!) 
  • Put your Genesee email address in the box and click “Get Started”  — that will send an email to your Genesee email and you need to carefully follow the directions from there.
  • You should end up with a new account on www.office.com that uses your Genesee email as your username and whatever password you have selected. As a reminder, this password is NOT connected to our existing Genesee passwords.
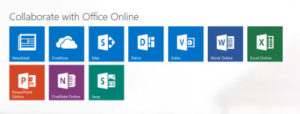
  • The page you land on will look something like this. You can use the Office components online and save your documents in the cloud storage.

Office 365 online menu

  • If you want to install any components on your personal computer, select the Settings icon in the upper right corner of the screen. Settings button  — or click the link that says “Install Office 2016”  [it may change!]
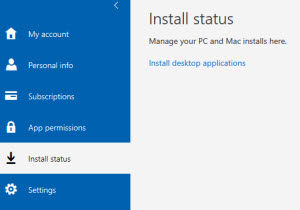
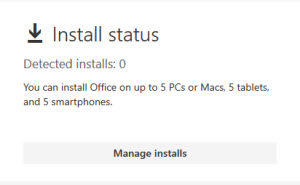
  • Once there, click on Install in the menu and follow the directions from there.

Office 365 install status

  • You have a limited number of installs for your personal use — you manage where you install the software from the “My Account” menu.

Office 365 manage installs

ATTENTION CHROMEBOOK USERS:  You cannot install Office 365 on your device because it is not running a compatible operating system.  You MAY use the Office 365 applications online through your Office.com account.

Questions should be sent to helpdesk@genesee.edu
π

Windows Camera as an Alternative to OBS to Display Document Camera

Some faculty wish to display content via the document camera in classrooms to in-person participants.  Applications like VLC and OBS are options but have drawbacks.  The Camera app in Windows 10 and 11 is a superior option.  [If remote students are a consideration, you will want to use Zoom to share doc cam content.]

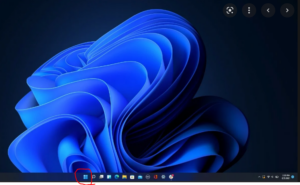
  • The easiest way to determine if a computer is running Windows 10 or 11 is to look at the Desktop.  If the Windows icon (4 squares) and other icons are centered, that’s Windows 11.  If they are left justified, that’s Windows 10
  • Next, left-click on the Windows icon.  Start typing c-a-m-e  and click to choose the Camera app.
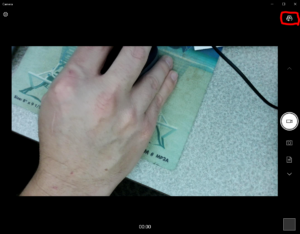
  • Since most classrooms have multiple cameras connected, you will need to toggle through to display the document camera–  click the camera with the counter-clockwise swoosh in the upper right
  • In the upper right, click the square to maximize the display window.  It will not be full screen, but it will be close


What Happens to My GCC Email Account When I Leave GCC?

Who: All GCC students with GCC email accounts: NetID@my.genesee.edu

What: When you graduate or otherwise leave GCC, do not forget your student email account and any emails, files and content, including the affiliated Google Drive. [GCC student email accounts are hosted by Google.]

Why: After you leave GCC, your GCC student email account will be shut down and all its contents deleted.  You and GCC will not be able to retrieve any deleted content.

When: Relocate or delete content as soon as possible following your graduation or departure from the college, ideally within six months.  GCC will remove your GCC student email account and affiliated Google account after one year.

How: YOU need to take action to preserve any email or content affiliated with your GCC student email account.  The college does not and will not save content after it deletes your email account.

  • If you have content you want to keep, move it to another location, such as a personal Google Drive account, other cloud storage (e.g., Box, Dropbox), flash drive, external hard drive).
  • Consider forwarding any emails you’d like to preserve to a personal email account.
  • If you wish, you can transfer Google content from your @my.genesee.edu account to another Google account. Follow this Google guide to do so.
  • If you wish to export/download your Google account information, check Google’s guidance here.


What About Microsoft Office 365 and OneDrive?

  • GCC students are provided with access to Microsoft Office 365 and OneDrive as a complimentary service while registered in one or more GCC classes. This access will be terminated within one year after you are no longer a registered GCC student.
  • As with your GCC email and Google Drive content, you should delete or relocate it within six months after leaving GCC. Microsoft provides guidance for downloading OneDrive content — Windows  or MacOS

Accessing Minitab Software– Desktop and Download Versions

The purpose of this document is to inform authorized GCC users of Minitab how to sign-on to Minitab online or to download Minitab to a personal computer.  To be authorized:  Students should consult the faculty member teaching a course where Minitab is required.  Faculty/staff should email a request to helpdesk@genesee.edu

Visit http://licensing.minitab.com

Enter your GCC email address

Choose your college.

Enter your NetID@genesee.edu


The system may prompt you for what type of account: work/school or personal. If so, select work/school


Enter your GCC login password (the one you use to log into myGCC)


Click the link to Minitab Statistical Software under My Products


BE SURE TO CHOOSE THE DOWNLOAD DESKTOP APP OPTION to download the software to a personal computer, click the Download Desktop App button and follow directions


IMPORTANT NOTE FROM Faculty: Although SUNY has made the WebApp available, in order to complete Minitab assignments in MAT129, you will need to download and install the Desktop App.


Multi-Factor Authentication (MFA) to Log In

(as of 1/10/2022)

To improve the security of your accounts, GCC is adding Multi-Factor Authentication (MFA) to the process you follow when logging into your GCC email (faculty and staff only) and myGCC (everyone).  In short, MFA provides another layer of identity verification beyond your password.  This document explains how to setup MFA, then how to utilize it subsequently when you log in. NOTE: MFA IS ONLY UTILIZED WHEN LOGGING IN TO A NON-GCC COMPUTER OFF CAMPUS.

HOW TO SET UP MFA

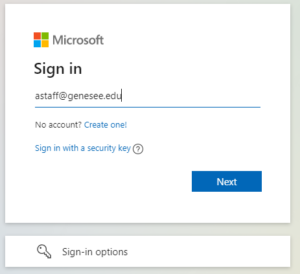
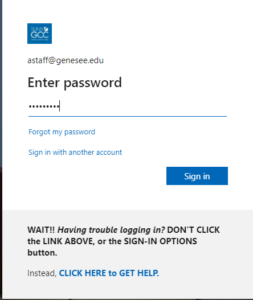
  1. Open a browser and navigate to https://outlook.live.com/owa/. Click ‘Sign In. Enter your GCC in the format NetID@genesee.edu, click “Next”, then on the next window enter your password and click “Sign in”.
    • STUDENTS:  Note that you must use NetID@genesee.edu for logging in to myGCC going forward. The format of your GCC email will remain NetID@my.genesee.edu

    Sign-in screen displayed after navigating to outlook.live.com/owa and clicking 'sign in.' The page will have a Microsoft logo, and a single field labeled 'Sign In.' A 'Next' button is also displayed.    The 'Enter Password' screen, following the previous screen. It has a GCC logo, repeats the login ID you just entered (example given here is 'astaff@genesee.edu'), and a single field labeled 'Enter password.' The field is followed by two links: 'Forgot my password' (NOTE, see below, THIS LINK SHOULD BE IGNORED), and 'Sign in with another account.' The submit button is labeled 'Sign in.' Below the sign-in button is the following help text for GCC users: "WAIT!! Having trouble logging in? DON'T CLICK the LINK ABOVE, or the SIGN-IN OPTIONS button. Instead, CLICK HERE TO GET HELP.'

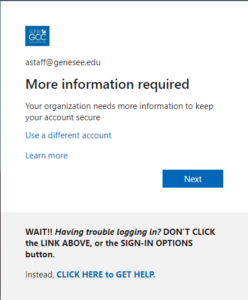
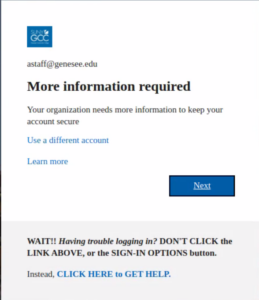
  2. The More information required window appears. Click “Next”
    'More Information Required' screen. It has a GCC logo and repeats your login ID. Below that the text reads: More information required. Your organization needs more information to keep your account secure.' These are followed by two links: 'Use a different account' (see below, this should be ignored) and 'Learn more.' The submit button is labeled 'Next'. Below the submit button is help text for GCC users: "WAIT!! Having trouble logging in? DON'T CLICK the LINK ABOVE, or the SIGN IN OPTIONS button. Instead, CLICK HERE to GET HELP.' (Use the link in this text instead of the help links above.)
  3. At this point, you’ll need to tell Microsoft how you’d like them to contact you for MFA. You can change this decision down the road. One option is to have Microsoft text or call your phone and give you a six digit code. Select “Authenticator phone” and “United States” from the dropdowns, enter your phone number, and then select a “Method” (Send text or call). Click “Next”. You will receive a code from Microsoft; enter it on the next page.
    Text of screen shot: Additional security verification. Secure your account by adding phone verification to your password. View video to know how to secure your account. Step 1: How should we contact you? [Select field is displayed with 'authentication phone' selected, 'Unitect States (+1)' selected as the country code, and the phone number field blank. Radio buttons are shown to select the Method. 'Send me a code by text message' is selected, 'Call me' is unselected.] The submit button is labeled 'Next.' Below the submit button is the following help text from Microsoft: 'Your phone numbers will only be used for account security. Standard telephone and SMS charges will apply.'
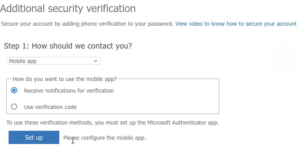
    Another option is to use the Microsoft Authenticator app.  Download this app ahead of time from your phone’s app store. To use this option, choose “Mobile App” from the dropdown and select Receive notifications for verification. Click Set up.
    Text of screen shot: Additional security verification. Secure your account by adding phone verification to your password. View video to know how to secure your account. Step 1: How should we contact you? [Select field is displayed with 'mobile app' selected. Radio buttons are shown with the legend 'How do you want to use the mobile app?' 'Receive notifications for verification' is selected, 'Use verification code' is unselected. Below the radio buttons the following instructions are displayed: 'To usse these verification methods, you must set up the Microsoft Authenticator app.' The submit button is labeled 'Set up', followed by the instruction 'Please configure the mobile app.'
    Follow the directions on the next screen to link your phone, Authenticator app, and account. Open the app on your phone, touch “Add an account”, choose “Work or school account”, and then “scan QR code”. You will scan the QR code with your phone. Once the QR code is scanned, your app will be linked. Click “Next” on your computer.
    Text of screen shot: "Configure mobile app. Complete the following steps to configure your mobile app. 1. Install the Microsoft authenticator app for Windows Phone, Android or iOS. 2. In the app, add an account and choose 'Work or school account' [the phrase is circled on the screenshot]. 3. Scan the image below. [A QR code is displayed.] If you are unable to scan the image, enter the following information in your app. Code: [a 9-digit sample code is shown.] If the app dipslays a six-digit code, choose 'Next.'" The submit button is labeled 'Next'.
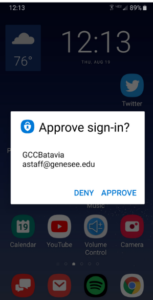
    On the next page, you should see the message: “Mobile app has been configured for notifications and verification codes”.  Click “Next”.  Microsoft will send a notification to your phone; you should be able to select “Approve”. You’re all linked up!
    A sample mobile phone screen is shown, illustrating how the Microsoft Authenticator pop-up dialog will appear. The dialog reads: "Approve sign-in? GCCBatavia, astaff@genesee.edu, DENY, APPROVE."
  4. At this point, you may be asked to re-validate your phone number. Follow the directions on the screen.
    Congratulations!
     You’re done setting up MFA!  You won’t need to perform these steps again!
  5. The next time you attempt to log in, the “More information required” window will appear again. This is Multi-Factor Authentication in action! You’ll see this on any new device you log into from off-campus. Click “Next”.
    The 'More information required' screen displayed when using the authenticator app for the first time. A GCC logo is displayed, followed by the login ID you are using. The screen reads: "More information required. Your organization needs more information ot keep your accoutn secure. Use a different account. Learn More." The submit button is labeled 'Next.' Below the submit button is help text for GCC users: "WAIT!! Having trouble logging in? DON'T CLICK the LINK ABOVE, or the SIGN IN OPTIONS button. Instead, CLICK HERE to GET HELP.'
    Depending on how you chose to get contacted, you’ll get slightly different screens here.  The important thing to note is the message “Don’t ask again for 90 days”. This means that you won’t be challenged again on this device for 90 days.  Follow directions and you’re in!
    The 'Enter code' screen displayed when authenticating using a code provided by either text message or voice call. A GCC logo is displayed, followed by the login ID you are using. The screen reads: "Enter code. We texted your phone +X xxxxxxxxxx. Please enter the code to sign in.' [code field, empty, followed by checkbox (selected) labeled 'Don't ask again for 90 days.'] Having trouble? Sign in another way. [use the GCC link given below, instead]" The submit button is labeled 'Verify.' Below the submit button is help text for GCC users: "WAIT!! Having trouble logging in? DON'T CLICK the LINK ABOVE, or the SIGN IN OPTIONS button. Instead, CLICK HERE to GET HELP.' (Use the link in this text instead of the help links above.)

IMPORTANT! If you need to add to or modify your MFA contact options:

  • Go to https://aka.ms./mfasetup
  • Sign in with netID@genesee.edu and password.
  • You will have to approve this sign in request using the MFA method you selected during set up

OneDrive Setup for Faculty/Staff

(Last updated: 12/13/2021)

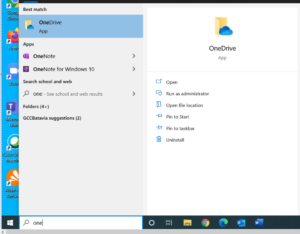
  1. Go to Start and start typing OneDrive. OneDrive will appear in the menu. Click it.


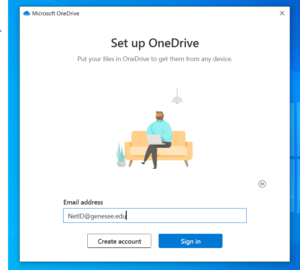
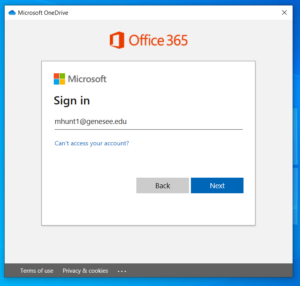
  1. Enter your NetID@genesee.edu (NOT your email, as requested) and click Sign In.


  1. IF prompted by the system, click Work or school.


  1. Verify that your NetID@genesee.edu appears correctly, then click Next.


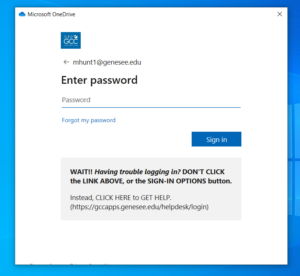
  1. Enter your GCC login password and click Sign In.


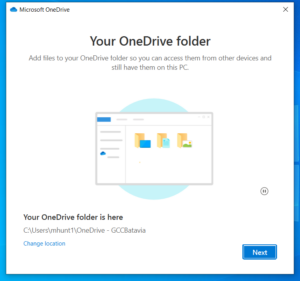
  1. Click Next.


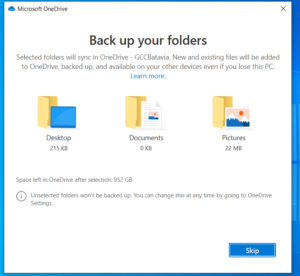
  1. Uncheck tick-boxes by Desktop, Documents and Pictures, then click Skip.


*** Steps 8-11 present informational content and only require you to click Next or Later***

  1. Click Next
  2. Click Next
  3. Click Next
  4. Click Later
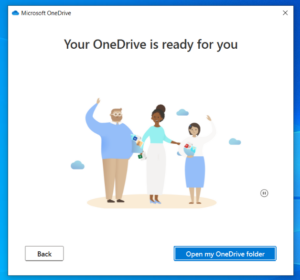
  5. Click Open my OneDrive Folder. Your OneDrive folder will open. OneDrive is now set up on this computer. Note that OneDrive is a single “cloud drive” and changes you make to its content or folders through any computer (e.g., work, home) will be permanent.