Multi-Factor Authentication (MFA) to Log In

(as of 1/10/2022)

To improve the security of your accounts, GCC is adding Multi-Factor Authentication (MFA) to the process you follow when logging into your GCC email (faculty and staff only) and myGCC (everyone).  In short, MFA provides another layer of identity verification beyond your password.  This document explains how to setup MFA, then how to utilize it subsequently when you log in. NOTE: MFA IS ONLY UTILIZED WHEN LOGGING IN TO A NON-GCC COMPUTER OFF CAMPUS.

HOW TO SET UP MFA

  1. Open a browser and navigate to https://outlook.live.com/owa/. Click ‘Sign In. Enter your GCC in the format NetID@genesee.edu, click “Next”, then on the next window enter your password and click “Sign in”.
    • STUDENTS:  Note that you must use NetID@genesee.edu for logging in to myGCC going forward. The format of your GCC email will remain NetID@my.genesee.edu
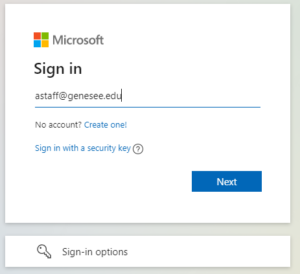
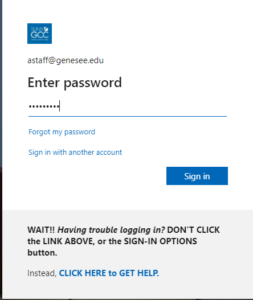
    Sign-in screen displayed after navigating to outlook.live.com/owa and clicking 'sign in.' The page will have a Microsoft logo, and a single field labeled 'Sign In.' A 'Next' button is also displayed.    The 'Enter Password' screen, following the previous screen. It has a GCC logo, repeats the login ID you just entered (example given here is 'astaff@genesee.edu'), and a single field labeled 'Enter password.' The field is followed by two links: 'Forgot my password' (NOTE, see below, THIS LINK SHOULD BE IGNORED), and 'Sign in with another account.' The submit button is labeled 'Sign in.' Below the sign-in button is the following help text for GCC users: "WAIT!! Having trouble logging in? DON'T CLICK the LINK ABOVE, or the SIGN-IN OPTIONS button. Instead, CLICK HERE TO GET HELP.'

  2. The More information required window appears. Click “Next”
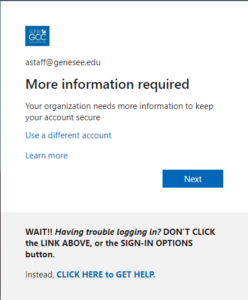
    'More Information Required' screen. It has a GCC logo and repeats your login ID. Below that the text reads: More information required. Your organization needs more information to keep your account secure.' These are followed by two links: 'Use a different account' (see below, this should be ignored) and 'Learn more.' The submit button is labeled 'Next'. Below the submit button is help text for GCC users: "WAIT!! Having trouble logging in? DON'T CLICK the LINK ABOVE, or the SIGN IN OPTIONS button. Instead, CLICK HERE to GET HELP.' (Use the link in this text instead of the help links above.)
  3. At this point, you’ll need to tell Microsoft how you’d like them to contact you for MFA. You can change this decision down the road. One option is to have Microsoft text or call your phone and give you a six digit code. Select “Authenticator phone” and “United States” from the dropdowns, enter your phone number, and then select a “Method” (Send text or call). Click “Next”. You will receive a code from Microsoft; enter it on the next page.
    Text of screen shot: Additional security verification. Secure your account by adding phone verification to your password. View video to know how to secure your account. Step 1: How should we contact you? [Select field is displayed with 'authentication phone' selected, 'Unitect States (+1)' selected as the country code, and the phone number field blank. Radio buttons are shown to select the Method. 'Send me a code by text message' is selected, 'Call me' is unselected.] The submit button is labeled 'Next.' Below the submit button is the following help text from Microsoft: 'Your phone numbers will only be used for account security. Standard telephone and SMS charges will apply.'
    Another option is to use the Microsoft Authenticator app.  Download this app ahead of time from your phone’s app store. To use this option, choose “Mobile App” from the dropdown and select Receive notifications for verification. Click Set up.
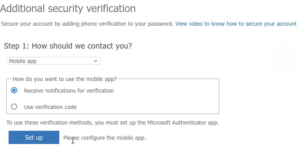
    Text of screen shot: Additional security verification. Secure your account by adding phone verification to your password. View video to know how to secure your account. Step 1: How should we contact you? [Select field is displayed with 'mobile app' selected. Radio buttons are shown with the legend 'How do you want to use the mobile app?' 'Receive notifications for verification' is selected, 'Use verification code' is unselected. Below the radio buttons the following instructions are displayed: 'To usse these verification methods, you must set up the Microsoft Authenticator app.' The submit button is labeled 'Set up', followed by the instruction 'Please configure the mobile app.'
    Follow the directions on the next screen to link your phone, Authenticator app, and account. Open the app on your phone, touch “Add an account”, choose “Work or school account”, and then “scan QR code”. You will scan the QR code with your phone. Once the QR code is scanned, your app will be linked. Click “Next” on your computer.
    Text of screen shot: "Configure mobile app. Complete the following steps to configure your mobile app. 1. Install the Microsoft authenticator app for Windows Phone, Android or iOS. 2. In the app, add an account and choose 'Work or school account' [the phrase is circled on the screenshot]. 3. Scan the image below. [A QR code is displayed.] If you are unable to scan the image, enter the following information in your app. Code: [a 9-digit sample code is shown.] If the app dipslays a six-digit code, choose 'Next.'" The submit button is labeled 'Next'.
    On the next page, you should see the message: “Mobile app has been configured for notifications and verification codes”.  Click “Next”.  Microsoft will send a notification to your phone; you should be able to select “Approve”. You’re all linked up!
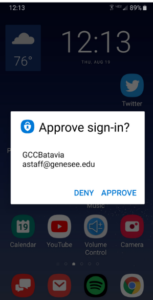
    A sample mobile phone screen is shown, illustrating how the Microsoft Authenticator pop-up dialog will appear. The dialog reads: "Approve sign-in? GCCBatavia, astaff@genesee.edu, DENY, APPROVE."
  4. At this point, you may be asked to re-validate your phone number. Follow the directions on the screen.
    Congratulations!
     You’re done setting up MFA!  You won’t need to perform these steps again!
  5. The next time you attempt to log in, the “More information required” window will appear again. This is Multi-Factor Authentication in action! You’ll see this on any new device you log into from off-campus. Click “Next”.
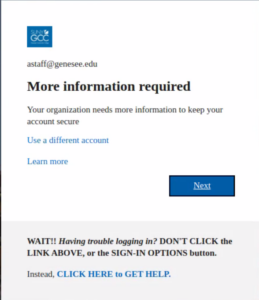
    The 'More information required' screen displayed when using the authenticator app for the first time. A GCC logo is displayed, followed by the login ID you are using. The screen reads: "More information required. Your organization needs more information ot keep your accoutn secure. Use a different account. Learn More." The submit button is labeled 'Next.' Below the submit button is help text for GCC users: "WAIT!! Having trouble logging in? DON'T CLICK the LINK ABOVE, or the SIGN IN OPTIONS button. Instead, CLICK HERE to GET HELP.'
    Depending on how you chose to get contacted, you’ll get slightly different screens here.  The important thing to note is the message “Don’t ask again for 90 days”. This means that you won’t be challenged again on this device for 90 days.  Follow directions and you’re in!
    The 'Enter code' screen displayed when authenticating using a code provided by either text message or voice call. A GCC logo is displayed, followed by the login ID you are using. The screen reads: "Enter code. We texted your phone +X xxxxxxxxxx. Please enter the code to sign in.' [code field, empty, followed by checkbox (selected) labeled 'Don't ask again for 90 days.'] Having trouble? Sign in another way. [use the GCC link given below, instead]" The submit button is labeled 'Verify.' Below the submit button is help text for GCC users: "WAIT!! Having trouble logging in? DON'T CLICK the LINK ABOVE, or the SIGN IN OPTIONS button. Instead, CLICK HERE to GET HELP.' (Use the link in this text instead of the help links above.)

IMPORTANT! If you need to add to or modify your MFA contact options:

  • Go to https://aka.ms./mfasetup
  • Sign in with netID@genesee.edu and password.
  • You will have to approve this sign in request using the MFA method you selected during set up
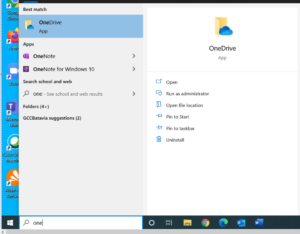
OneDrive Setup for Faculty/Staff

(Last updated: 12/13/2021)

  1. Go to Start and start typing OneDrive. OneDrive will appear in the menu. Click it.


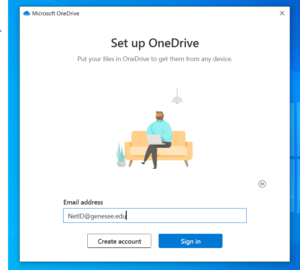
  1. Enter your NetID@genesee.edu (NOT your email, as requested) and click Sign In.


  1. IF prompted by the system, click Work or school.


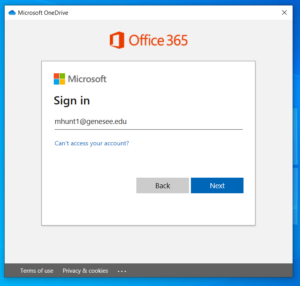
  1. Verify that your NetID@genesee.edu appears correctly, then click Next.


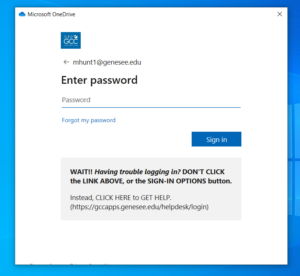
  1. Enter your GCC login password and click Sign In.


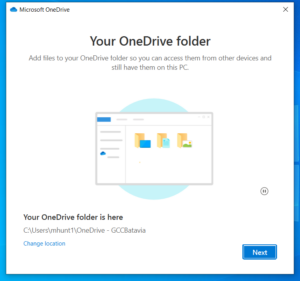
  1. Click Next.


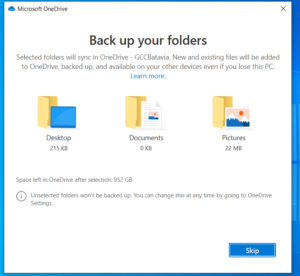
  1. Uncheck tick-boxes by Desktop, Documents and Pictures, then click Skip.


*** Steps 8-11 present informational content and only require you to click Next or Later***

  1. Click Next
  2. Click Next
  3. Click Next
  4. Click Later
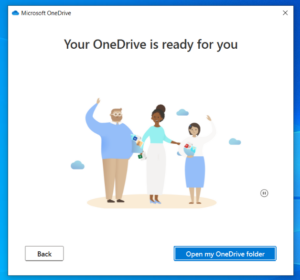
  5. Click Open my OneDrive Folder. Your OneDrive folder will open. OneDrive is now set up on this computer. Note that OneDrive is a single “cloud drive” and changes you make to its content or folders through any computer (e.g., work, home) will be permanent.

What is SoftLINK and How Do I Use It? [Faculty]

SoftLINK is the software replacement to the LINK hardware system that was in place in various computer labs across campuses.  In the LINK system, a separate monitor sat on the instructor desk, depicting a layout of student workstations and allowing instructors various controls of these workstations.  In the new SoftLINK system, software provides a similar view of student workstations along with a number of control features.

The SoftLINK vendor recently completed a two-part training program.  Each part is about 60 minutes in length.  After watching these videos, please direct any further questions about SoftLINK to helpdesk@genesee.edu

SoftLINK training Part 1 of 2

SoftLINK training Part 2 of 2

GCC Voice Mail User Guide

For more extensive documentation, scroll to the bottom for the PDF documentation.

Set up a Temporary Greeting

Access your voice mail. Call ext. 6400 and then enter your password

  • Press 82
  • Press 3 for the temporary greeting
  • Press 5 to record the message
  • Press # when finished
  • Press 9 to set an expiry date — follow the instructions
  • Hang up

Distribution List

First you will have to make your Distribution List. You can create up to 9 lists with up to 99 entries in each list.

  • Log into your mailbox
  • Press 85
  • Enter a number from 1 to 9 to identify this list, then press #
  • Press 5 to create the list
  • Enter each mailbox number followed by #
  • When list is complete, press #
  • To delete a number or name after you enter it, Press 0 then #
  • Press 83 to log off before hanging up

Express Messaging

From Your Desk:

  • Enter ext: 6000 (Express Messaging)
  • You will hear “Express Messaging to mailbox?”
  • Enter the mailbox number of the person to whom you want to leave the message, followed by the # key. You will hear wither the person’s name or mailbox number.
  • Leave your message and hang up

From Outside the Building:

    • Dial 585-343-0055
    • Enter ext: 6000
    • You will hear “Express Messaging to mailbox?”

Enter the mailbox number of the person to whom you want to leave the message, followed by the # key. You will hear wither the person’s name or mailbox number.

  • Leave your message and hang up


Call Transfer

To transfer a caller to voicemail from a digital telephone:

  • Press Transfer Button
  • Enter ext: 6000
  • Enter mailbox number and # key
  • Press the Transfer button again

To transfer a caller to voicemail from a single line telephone:

  • Press dwitch hook
  • Enter ext: 6000
  • Enter mailbox number and # key
  • Press switch hook again

Call Forward

All calls can be forwarded to your mailbox by activating call forward to ext: 6400 (Meridian Mail). The caller will receiver your greeting and can leave a message.

Voice Mail User Guidelines

Voice mailbox management is the responsibility of the user. The listed items should be used and reviewed on a regular basis.

  • Review current messages and discard in a timely manner
  • Respond to voice mail messages promptly (within 2 hours is recommended)
  • Encourage callers to leave detailed messages, not just their name and number
  • Take time to update and review your personal greeting, reflecting your current location, meetings, sick time, vacation, etc
  • When out of the office check your voicemail on a regular basis
  • Change your password periodically for security and privacy

PDF Documentation

This documentation does NOT meet accessibility requirements. The majority of the commands are in the text above. If you need assistance with these files, contact helpdesk@genesee.edu and let the folk there know what you are looking for.

How to: Distribution list; Log Off; Express Messaging; and Telephone Features — VoiceMail-1

How to: First time log in for extensions; first time log in for voicemail; to log into your mailbox; to log into a voice mailbox; playing message — VoiceMail-2

How to: To record your personal greeting; Record your name for personal verification; Change your password; Compose and send a message to one or more mailboxes — VoiceMail-3

Reporting Telephone or Voice Mail Problems

If you have problems with any college phone, please report that to the help desk by sending an email to helpdesk@genesee.edu with the following information.

  • Campus
  • Room
  • Campus Phone number
  • Issue

Include in your email:

Is there dial tone, is there static on the line, a working phone number to contact you.

Someone from the Telecom team will contact you to discuss/research your issue further.

Microsoft Office 365 for Home Use (GCC Faculty/Staff)

As part of GCC’s contract with Microsoft, GCC faculty and staff have free access to download and use Microsoft Office 365 (e.g., Word, Excel, PowerPoint) on a personal computer.

Follow these steps:

NOTE: If you retrieve your GCC email online (as opposed to through the Outlook application on your GCC office computer), then these initial steps will look familar.

  1. Visit https://outlook.live.com/owa/ on your web browser
  2. Click the Sign In button in the upper right.
  3. On the Sign In screen, enter your GCC NetID@genesee.edu  [We know it asks for your email address, but that is not how the system is set for GCC.]
  4. On the Password screen, enter your GCC password [the same one you use to log into a GCC computer]
  5. On the Stay Sign In screen, we recommend choosing NO
  6. Once logged in, you will be in Outlook and see your GCC email.  Click the 9-dot icon in the upper left.
  7. Click on Office 365 →
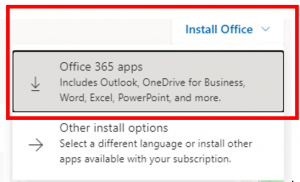
  8. Notice Install Office button  on right
  9. Click the arrow to the right of Install Office.  Select the first option, Office 365 apps
  10. Follow the prompts to install Office 365 on your computer
  11. You will be able to use Office 365 on this computer as long as you have a valid GCC faculty or staff email address

Blackboard Highlights

Blackboard is GCC’s primary Learning Management System (LMS).  That is, this is the digital tool used in nearly all GCC courses to manage a variety of tasks, from storing course materials, linking to videos and third-party course resources, accepting assignment submissions, displaying grades, hosting threaded discussions, and serving as a testing/quiz tool or portal.

How Do I Access My Blackboard Courses?

Log into myGCC (GCC homepage, top-center link).  Your Blackboard courses appear under the My Courses tab.  Click on a course to enter the course.

What Type of Hardware/Device Should I Use With Blackboard?

Technically, you can login to Blackboard through many hardware devices, such as smartphones, Chromebooks, PC’s, and Mac computers.  However, some services and tools within Blackboard are incompatible/do not function with some of these devices. Click this link for more information: https://help.blackboard.com/Learn/Instructor/Course_Content/Mobile_Friendly_Courses/Supported_Course_Content_in_Blackboard_App

GCC’s Computer Services department highly recommends that students use a PC/Windows-based desktop or laptop to access and complete tasks within Blackboard.

There is a Blackboard app for my Smartphone.  Can I Use It?

This app is fine for basic communication, like email and viewing Announcements.  However, it does not support many file types (so it is not a good choice for submitting assignments) and it does not support certain functions and tools within a course’s Blackboard site.  Click this link for limitations:  https://help.blackboard.com/Learn/Instructor/Course_Content/Mobile_Friendly_Courses/Supported_Files_in_Apps


Opting IN or OUT of Receiving Microsoft’s Daily Cortana Briefing Email

The Cortana Briefing is a free Microsoft Windows 10 service that sends daily email reminders of upcoming and missed meetings and tasks from your Outlook calendar.  Interested individuals may opt in to receive these daily messages.

Step 1:  Open a web browser and visit http://cortana.office.com    When you are not on campus and logged into your GCC office PC, you will need to sign in with NetID@genesee.edu and your login password

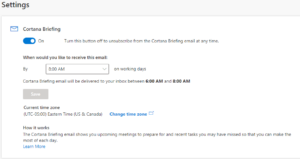
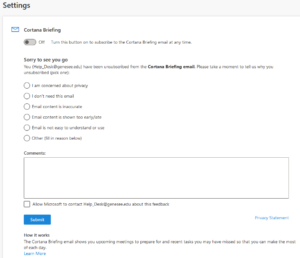
Step 2:  See this Cortana Briefing screen, currently set to OFF


Step 3: Left-click the dot on the slide-button to set to ON.  You may change the time you want to receive the message by using the pull-down menu.  Also check that the correct time zone (Eastern in GCC’s case) is set, and change it if needed.


You may learn more about the Cortana Daily Briefing here:  https://docs.microsoft.com/en-us/briefing/be-overview

Unblock/Block Pop-Up Windows in Common Web Browsers

A web browser may be set to allow or disallow pop-up windows– with select or all websites.  We do not recommend that you disable pop-up blocker all together.  If you wish to change the blocker in your web browser, consult these directions.  Note that these directions are not comprehensive and may vary across different hardware/operating systems (e.g., Windows, Mac, iOS, Android, desktops, laptops, smart devices) and versions of a web browser.


CHROME (WINDOWS)

By default, Chrome will notify you when a pop-up is blocks and give you an option to see it. To turn off pop-up blocker, follow these instructions:

  1. Click the Customize and control Google Chrome menu (the three dots in the upper right corner)
  2. Select Settings.
  3. Click Advanced at the bottom.
  4. Under Privacy and security, click the Site Settings button.
  5. Select Pop-ups and redirects.
  6. To disable the pop-up blocker uncheck the Blocked (recommended) box.
  7. To enable pop-ups on specific sites, check Blocked (recommended) and click Add next to Allow and enter the URL(s).

FIREFOX (WINDOWS)

  1. Select the three horizontal bars in the upper right corner.
  2. Select Options.
  3. Select the Privacy and Security tab.
  4. To disable the pop-up blocker, uncheck the Block pop-up windows box below Permissions.
  5. To allow specific pop-ups, click Exceptions and enter the URL(s).
  6. Close the window.
  7. Click OK.

EDGE (WINDOWS)

  1. Open your Microsoft Edge browser
  2. Go to Settings, then select more > Settings > Privacy & Security
  3. Under Security, switch Block pop-ups to off to disable the pop-up blocker

INTERNET EXPLORER (WINDOWS IE 8 AND EARLIER)

  1. Click Tools.
  2. Click Pop-up Blocker.
  3. Click Turn Off Pop-up Blocker.

INTERNET EXPLORER (WINDOWS IE 9 AND LATER)

  1. Click the GEAR icon and select Internet Options.
  2. Select the Privacy tab.
  3. Uncheck Turn on Pop-up Blocker to disable the pop-up blocker.
  4. Click the Settings button to disable pop-up blockers for specific sites.
  5. Click OK.


CHROME (MAC)

By default, Chrome will notify you when a pop-up is blocks and give you an option to see it. To turn off the pop-up blocker, follow these instructions:

  1. Click the Customize and control Google Chrome menu (the three dots in the upper right corner)
  2. Select Settings.
  3. Click Advanced at the bottom.
  4. Under Privacy and security, click the Content Settings button.
  5. Select Pop-ups and redirects.
  6. To disable the pop-up blocker uncheck the Blocked (recommended) box.
  7. To enable pop-ups on specific sites, check Blocked (recommended) and click Add next to Allow and enter the URL(s).

FIREFOX (MAC)

  1. Select Preferences from the Firefox menu.
  2. Select the Privacy and Security tab.
  3. To disable the pop-up blocker, uncheck the Block pop-up windows box below Permissions.
  4. To allow specific pop-ups, click Exceptions and enter the URL(s).
  5. Close the window.
  6. Click OK.

SAFARI (MAC)

  1. From the Safari menu, select Preferences
  2. Click Websites at the top of the window
  3. Select Pop-up Windows.
  4. To disable the pop-up blocker select Allow next to When visiting other websites.
  5. To allow specific pop-ups, navigate to the web page, follow steps 1-3 and then select Allow next to the name of the site.


Temporary Workaround to Access Class Lists from Banner Self Service

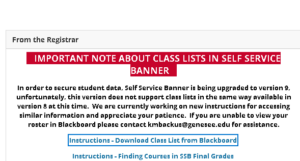
As noted in the image below in the “From the Registrar” module in myGCC, due to changes in Self Service Banner (SSB), Downloading Class List from Blackboard or Finding Courses in SSB Final Grades functions currently do not work properly.

Use the links below or visit the From the Registrar module in myGCC and click on the included links.

https://genesee.open.suny.edu/modules/_693_1/ClassListDownload.pdf

https://genesee.open.suny.edu/modules/_693_1/FindCoursesFinalGrades.pdf


This image appears in the From the Registrar module in myGCC: