Last updated: 4/13/2020
Network share drives need to be “mapped” to your computer you are using in order to have access to the files.
First: Ask the owner of the share drive to email the Help Desk (helpdesk@genesee.edu) and request that you be given access.
Second: Follow the steps below to map the drive:
- Ensure that you are logged into the computer with your credentials, as the share drive, once mapped, will stay in your profile. This means the share drive will appear each time you log on to THAT computer.
- Press the Windows 10 key
 , then the “E” key on your computer’s keyboard. If your keyboard does not have a Windows 10 key, left-mouse click the Windows icon on your computer’s screen, then type This PC. Left-mouse click the This PC icon
  ]. The This PC window will open.
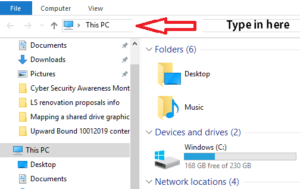
 - At the top of the window, click on ThisPC and type \\the server name. The server name is the first part of the link you were given. For example \\share1\ABC the server name is share1 You would then enter \\share1 Be sure that This PC no longer appears, then press the Enter key.
- Scroll down to the name of your share folder and right-mouse click on the folder. Left-mouse click Map network drive. This drive will now appear under your list of Network locations on the This PC