Blackboard Highlights

Blackboard is GCC’s primary Learning Management System (LMS).  That is, this is the digital tool used in nearly all GCC courses to manage a variety of tasks, from storing course materials, linking to videos and third-party course resources, accepting assignment submissions, displaying grades, hosting threaded discussions, and serving as a testing/quiz tool or portal.

How Do I Access My Blackboard Courses?

Log into myGCC (GCC homepage, top-center link).  Your Blackboard courses appear under the My Courses tab.  Click on a course to enter the course.

What Type of Hardware/Device Should I Use With Blackboard?

Technically, you can login to Blackboard through many hardware devices, such as smartphones, Chromebooks, PC’s, and Mac computers.  However, some services and tools within Blackboard are incompatible/do not function with some of these devices. Click this link for more information: https://help.blackboard.com/Learn/Instructor/Course_Content/Mobile_Friendly_Courses/Supported_Course_Content_in_Blackboard_App

GCC’s Computer Services department highly recommends that students use a PC/Windows-based desktop or laptop to access and complete tasks within Blackboard.

There is a Blackboard app for my Smartphone.  Can I Use It?

This app is fine for basic communication, like email and viewing Announcements.  However, it does not support many file types (so it is not a good choice for submitting assignments) and it does not support certain functions and tools within a course’s Blackboard site.  Click this link for limitations:  https://help.blackboard.com/Learn/Instructor/Course_Content/Mobile_Friendly_Courses/Supported_Files_in_Apps
 

Storing content on your P drive

Last updated: 9/2/2020

Your P drive is a cloud-based storage container, which is available when you are logged into your GCC work station, whether on-campus or through remote access.

Your P drive is a safe and practical location to store your work and course files, and its content is backed up nightly.  You are welcome to keep document and image files on this drive and should not experience a problem with ample storage space.

Audio and/or video files– for courses or other purposes– quickly consume storage space and we encourage you not to store them long-term on your P drive.  In fact, if you try to save such files, you will receive a message to this effect.

GCC provides a practical and convenient solution for audio and video files called Ensemble.  Think of it as a vast cloud-based video and audio shelf, on which you may store a seemingly endless number of such files.  In fact, if you record Zoom sessions of your courses, these recordings are automatically uploaded to your Ensemble account.  You also may easily create links in your Blackboard course sites to specific Ensemble files, making it easy for students to find and view audio/video content related to your course(s).

If you do not already have an Ensemble account (or are unsure if you have one), contact helpdesk@genesee.edu

Organizing Your Course Listing

After a semester or two, your course listing in Blackboard can become quite messy and it’s difficult to tell which are your current semester courses.

To organize your course listing, go to the My Courses tab and then point your cursor at the far right end of the My Courses module. You should see a settings ‘wheel’ pop up (like below). Go ahead and click on that wheel.

Settings for My Courses


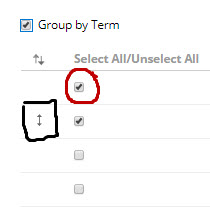
That brings you to a new screen. This will be different for everyone, but the key piece you are looking for is the “Group by Term” selection. Click that box.


If you point your cursor to the far left of the “Select All/Unselect All” section, you will get an up/down arrow (in the square below). Click on the arrow to drag the current semester to the top of the list.

Settings for Group by Term

Use the Select/Unselect (in the circle) to deactivate older semesters. The course access is still there, just not visible on the My Courses page. If you find later that you need to access an older semester, you can come back into this area and Select a semester to turn it back on.

Scrolling down the page allows you to select/unselect specific courses, but generally selecting/unselecting terms is the best option.

IMPORTANT: When you are finished, remember to select that “Submit” button that is on the top and the bottom of the page (they both work, chose the one you can see!).

You can update your course listing as needed.